Cultivating Joy: How to Create Adorable Chocolate-Covered Strawberry Carrots & Soil
Imagine a delightful dessert that's as charming to look at as it is delicious to eat, a treat that brings smiles to faces young and old. We're talking about an edible "garden patch" featuring vibrant, chocolate-covered strawberry "carrots" nestled in rich, crumbled "soil." This ingenious creation, often dubbed a
chocolate carrot strawberry garden, is a fantastic activity for families, a show-stopping centerpiece for spring celebrations, and an especially heartfelt gift for occasions like Mother's Day or Easter. It’s a simple DIY craft that transforms everyday ingredients into a whimsical culinary landscape.
Forget complicated baking; this edible garden is all about assembly, creativity, and a touch of chocolate magic. Perfect for toddlers, preschoolers, and older children to help craft, it’s a wonderful way to engage little hands and minds while creating something truly special for loved ones who adore gardening – or just love chocolate and strawberries!
Why You'll Love Crafting a Chocolate Carrot Strawberry Garden
The appeal of this dessert extends far beyond its adorable appearance. It embodies simplicity, versatility, and the joy of shared creation.
A Delight for All Ages
One of the greatest joys of making a
chocolate carrot strawberry garden is its universal appeal. Kids are naturally drawn to the hands-on process of crushing cookies for dirt and dipping strawberries, fostering a sense of accomplishment and fun. For adults, it's a nostalgic trip back to childhood, a stress-free crafting experience that yields impressive results. It's a fantastic bonding activity, turning kitchen time into cherished memories.
Perfect for Any Occasion
While often highlighted as an ideal Mother's Day dessert or a festive Easter treat, this edible garden is incredibly versatile. It makes a charming addition to spring birthday parties, baby showers, garden-themed events, or simply as a fun weekend project. Its playful nature brings a smile to any gathering, making it a memorable focal point on your dessert table. For a truly thoughtful gesture, consider pairing this edible garden with another homemade craft, like our
Mother's Day Craft: DIY Edible Chocolate Strawberry Carrot Garden, to amplify the love.
Simple Yet Stunning
You don't need to be a gourmet chef to create this masterpiece. The beauty of the
chocolate carrot strawberry garden lies in its straightforward steps and readily available ingredients. In as little as 15 minutes of active crafting time, you can transform simple items into an eye-catching, mouth-watering display. It's a testament to how creative thinking can elevate humble ingredients into something truly extraordinary.
Essential Ingredients and Tools for Your Edible Masterpiece
Gathering your supplies is the first exciting step in bringing your edible garden to life. The beauty of this craft is that most ingredients are staples you might already have or can easily find at any grocery store.
The "Carrots": Fresh Strawberries
*
Fresh Strawberries: Choose firm, ripe strawberries with their green tops intact, as these will serve as the "carrot tops." Aim for medium to large strawberries for easier dipping and a more prominent "carrot" look. Make sure they are washed and completely dry before dipping; moisture will cause the chocolate to seize.
The "Soil": Crushed Chocolate Cookies
*
Chocolate Sandwich Cookies (e.g., Oreos): These are perfect for creating rich, dark "soil." The cream filling helps bind the crumbs slightly, giving the "dirt" a realistic texture. You'll need about one package, depending on the size of your garden patch.
*
Optional: For extra richness, a tablespoon or two of melted butter can be mixed into the cookie crumbs to give them a slightly more cohesive, "damp soil" feel, though it's not strictly necessary.
The "Orange": Candy Melts or White Chocolate with Food Coloring
*
Orange Candy Melts: These are specifically designed for melting and coating, offering a smooth finish and vibrant orange color without needing to add food coloring. They melt easily and consistently.
*
White Chocolate Chips or Melting Wafers: If you prefer to use white chocolate, you'll also need oil-based food coloring in orange. Regular water-based food coloring can cause chocolate to seize and become clumpy.
Optional Edible Enhancements
*
Green Sprinkles or Shredded Coconut (dyed green): For an extra touch of realism, a sprinkle of green "foliage" around the base of your strawberry carrots can mimic leafy greens.
*
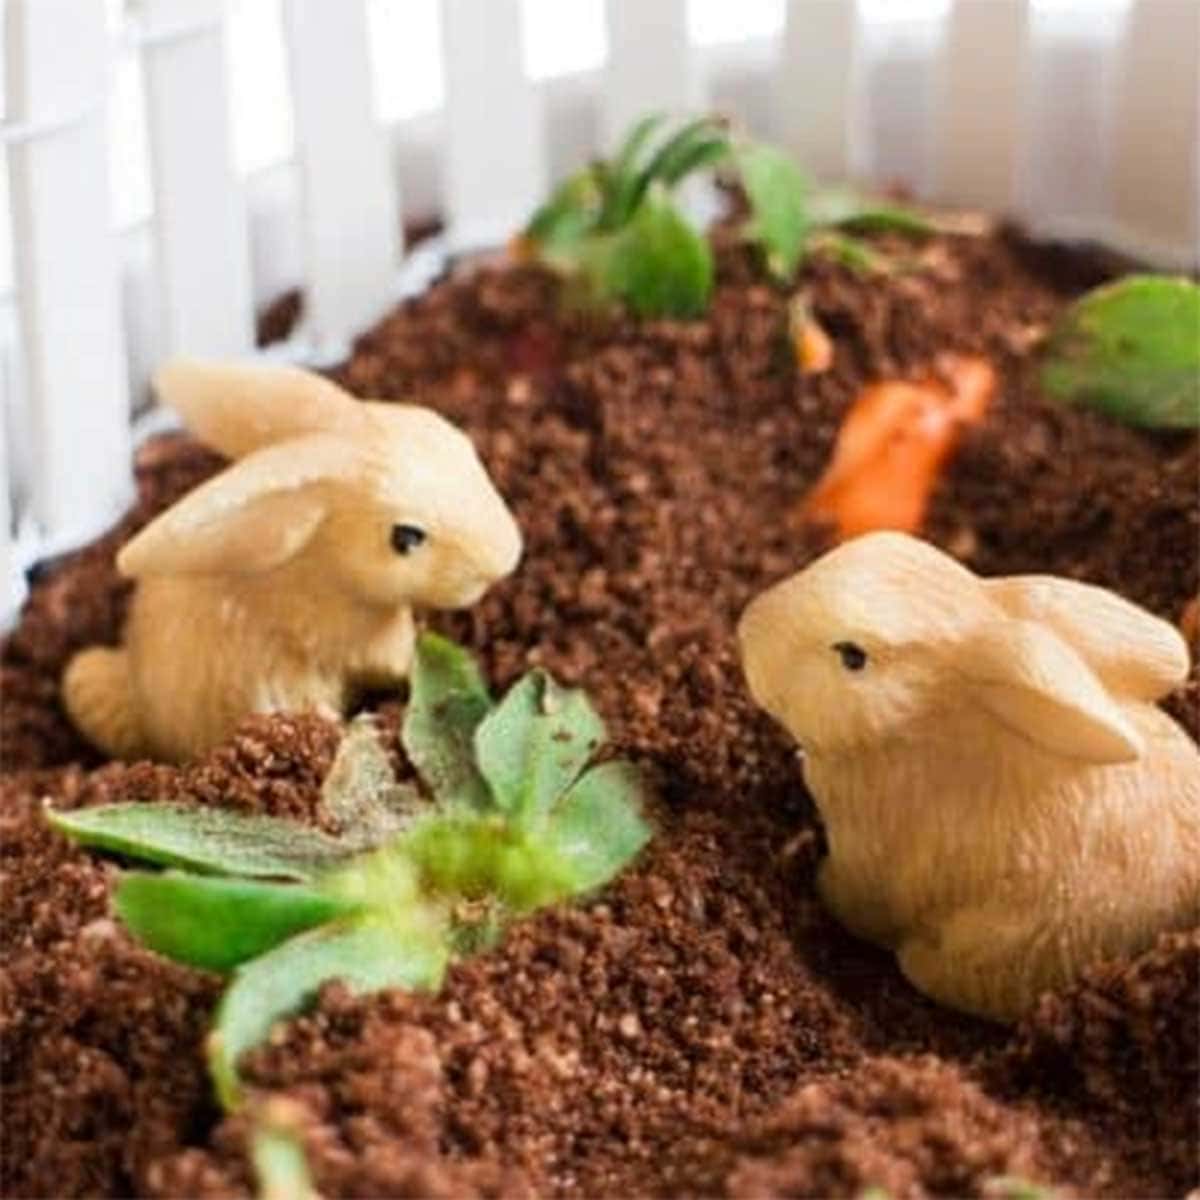
Edible Decorative Bunnies or Butterflies: Small sugar decorations can add to the garden theme.
*
Chocolate Rocks or Pebbles: These can be scattered around the garden for added texture and visual interest.
Tools of the Trade
*
Food Processor or Blender: Essential for quickly pulverizing the chocolate cookies into fine "soil" crumbs. If you don't have one, a Ziploc bag and a rolling pin will also do the trick – just embrace the therapeutic smashing!
*
Microwave-Safe Bowls: For melting your candy melts or chocolate.
*
Spatula or Spoon: For stirring melted chocolate and transferring crumbs.
*
Baking Sheet Lined with Parchment Paper: A great surface for letting dipped strawberries set, preventing them from sticking.
*
Serving Platter, Bowl, or Individual Pots: For assembling your garden. A shallow dish works best for a large patch, or consider mini terra-cotta pots (lined with plastic wrap for food safety) for individual servings.
*
Small Hands (Optional, but highly recommended!): Enlist your little helpers for maximum fun and cuteness.
Step-by-Step Guide: Cultivating Your Chocolate Carrot Strawberry Garden
Creating your edible garden is a straightforward process, broken down into a few simple and enjoyable steps. Even if you're aiming for a quick turnaround, our guide for a
Minute Edible Garden: Chocolate Carrot Strawberry Dessert for Kids can offer even more time-saving tips!
Step 1: Preparing Your Rich Chocolate "Soil"
1.
Crush Your Cookies: Place your chocolate sandwich cookies (including the cream filling) into a food processor. Pulse until they are finely ground into a consistent, crumbly texture that resembles dark, rich soil. If you're using a bag and rolling pin, ensure all large chunks are thoroughly crushed.
2.
Spread the Soil: Transfer the crushed cookie "soil" to your chosen serving platter, bowl, or individual pots. Spread it evenly, creating a base layer about 1-2 inches deep. This will be where your "carrots" are planted. Set aside.
Step 2: Dipping Your Juicy "Carrots"
1.
Melt the Chocolate: Place your orange candy melts (or white chocolate with oil-based food coloring) in a microwave-safe bowl. Heat in 30-second intervals, stirring thoroughly after each, until the chocolate is completely melted and smooth. Be careful not to overheat, as this can cause the chocolate to seize or burn. Stir until silky and free of lumps.
2.
Dip the Strawberries: Holding each dry strawberry by its green top, carefully dip it into the melted orange chocolate. Rotate and swirl the strawberry until it's evenly coated, leaving a small portion of the green top exposed to look like carrot greens.
3.
Allow Excess to Drip: Gently tap the strawberry against the edge of the bowl to allow any excess chocolate to drip off. This helps create a smooth, clean "carrot" shape.
4.
Place on Parchment: Carefully place the dipped strawberries on your parchment-lined baking sheet. Repeat for all strawberries. You can allow them to set slightly at room temperature or place them in the refrigerator for 5-10 minutes to speed up the setting process.
Step 3: Planting Your Carrots in the "Soil"
1.
Plant Your Carrots: Once the chocolate on your strawberries is mostly set (firm to the touch), it's time to "plant" them. Gently press each chocolate-covered strawberry, orange side down, into the prepared cookie "soil." Push them down just enough so they stand upright and are securely nestled in the crumbs, leaving the vibrant green tops exposed.
2.
Brush with "Dirt": Use your fingers or a small spoon to gently brush some of the cookie crumbs up around the base of each strawberry carrot, further mimicking the look of freshly pulled vegetables from the earth.
Step 4: The Finishing Touches (Optional Fun)
1.
Add Greenery: If using green sprinkles or dyed shredded coconut, scatter them lightly around the base of your strawberry carrots to enhance the look of leafy foliage.
2.
Place Decorations: Artfully arrange any edible decorative bunnies, butterflies, or chocolate rocks throughout your
chocolate carrot strawberry garden. Remember, if you're using non-edible craft items like mini fences or figurines, ensure they are clearly marked or removed before serving.
3.
Chill (Optional): If you plan to serve the garden later, a brief chill in the refrigerator can help everything set perfectly, especially on a warm day.
Tips for Success and Creative Variations
To ensure your
chocolate carrot strawberry garden is not just adorable but also delicious and perfectly crafted, keep these tips in mind. Plus, explore ways to add your unique flair!
Choosing the Right Strawberries
Always opt for firm, ripe strawberries that aren't overly soft or bruised. Size matters here; medium to large strawberries work best for dipping and create a more satisfying "carrot" presence. Crucially, wash your strawberries thoroughly and then dry them *completely*. Pat them gently with paper towels, and if time allows, let them air dry for a bit longer. Any water residue will cause the melted chocolate to seize and become lumpy.
Melting Chocolate Like a Pro
When melting your candy melts or white chocolate, use a microwave at 50% power, stirring every 30 seconds. Overheating can burn the chocolate or make it thick and unusable. For an even smoother melt, especially with white chocolate, a double boiler method (a heatproof bowl set over a saucepan of simmering water, ensuring the bowl doesn't touch the water) can provide gentler, more consistent heat. If your chocolate seems too thick, a tiny bit of coconut oil or vegetable shortening (1/2 teaspoon per cup of chocolate) can help thin it out, but avoid adding too much.
Individual Servings vs. Grand Garden Patch
For a large gathering, a grand platter or shallow serving bowl makes an impressive communal centerpiece. Guests can then "pick" their own carrots from the soil. For more personalized treats, consider creating individual edible gardens in mini terra-cotta pots (lined with plastic wrap or foil for food safety), small ramekins, or clear plastic cups. This makes for easy serving and charming party favors.
Storage and Shelf Life
Your
chocolate carrot strawberry garden is best enjoyed fresh, ideally within a few hours of assembly. If you need to prepare it in advance, store it lightly covered in the refrigerator for up to 24 hours. The strawberries will stay fresh, and the chocolate will remain set. However, extended refrigeration can sometimes cause the cookies to soften slightly.
Fun Twists and Customizations
*
Different Cookie "Soil": Experiment with other chocolate cookies for varied "soil" flavors – perhaps chocolate graham crackers for a different texture, or even a mix of dark and milk chocolate cookies.
*
White Chocolate "Carrots": For a fun variation, use white chocolate dyed with green food coloring for "cabbage" or "lettuce" heads, or even red candy melts for "radishes"!
*
Add Edible Flowers: Small, edible flowers like pansies or violas can be placed around the garden for a truly delicate and realistic touch.
*
Pretzel Stick "Twigs": Small pretzel sticks can be partially covered in chocolate and placed amongst the strawberries to resemble fallen twigs or branches.
*
Hidden Surprises: For a delightful treat, consider placing a small chocolate candy or a gummy worm beneath some of the cookie soil for a fun "digging" surprise!
This wonderful dessert craft, an adorable
chocolate carrot strawberry garden, is more than just a sweet treat; it's an experience. It brings together the simple joy of creating, the delight of fresh flavors, and the warmth of shared moments. Whether you're celebrating a special occasion or simply looking for a fun activity with the kids, this edible garden is a recipe for smiles, laughter, and delicious memories. So, gather your ingredients, unleash your creativity, and get ready to cultivate some joy!